When we bought our little Florida Keys bungalow back in 2021, I took my sweet time figuring out exactly what vibe I wanted to bring to the interior. This beach house dresser makeover being one of them!
We trekked quite a bit to the salvation army and habitat for humanity – why? Well because the Florida Keys has very limited places to shop for the home, but also that I wanted to shop more sustainably. I wanted pieces that told a story or had character (a long life).
It just so happens my husband, on a walk through our neighborhood, found this adorable dresser out on the curb, for free. It was in pristine condition, and entirely wood, which is increasingly difficult to find these days. So of course we scooped it up, and I knew exactly what I wanted to do with it.
Transform it into a slice of Key Lime Pie, of course!!!
In this post I break down step by step how I DIYed this old Florida beach house dresser makeover.
This post contains affiliate links. All products and links listed on TML are affiliates through 3rd parties such as Awin, Etsy and Amazon. Meaning, at no cost to you, by clicking and purchasing through those links I will earn a small commission. As an Amazon Associate, I earn from qualifying purchases. To learn more read TML Terms and Disclosure.

Key lime beach house dresser makeover DIY
I kept this project uuuuuuber simple, and cheap, obviously. Below, I breakdown the supplies I used and that you’ll need if you want to recreate this look.
Paint and supplies
- Krylon Spray paint in Celery Green as a primer (2 cans purchased from Amazon or Michael’s)
- Benjamin Moore base paint color Iced Mint 2030-70 (purchased from Ace Hardware)
- Satin Polyurethane 1 Pt. (purchased from Ace Hardware)
- DecoArt metallic paint in Peacock Pearl (1 Bottle) and DecoArt metallic paint in Copper (1 Bottle) – you can get these at craft stores like Hobby Lobby, Michael’s or even Amazon
- 1-inch wide bristle brush (x3) – I bought more than I needed just in case since these are cheap
- Fine detail brush
- Terrycloth rag (or you can use paper towel, honestly)
- Sandpaper 150 Grit (purchased from Amazon)
- [Optional] Paint stripper and scrapper tool – I used this solely to remove the shine finish in areas
Cleaning, sanding and buffing
Honestly, this piece didn’t require any repair or much prep work other than the top. I wiped down the entire dresser with soapy water and removed the hardware before starting the sanding process.
The dresser was finished heavily with a shiny protective coating, which I wanted to remove as much as possible. Since I wanted to make this look like – literally – a slice of key lime pie, I wanted to mimic the top of the dresser as being the graham cracker pie crust, so I reduced as much of that shine as I could while keeping the natural dresser color.
I went as far as trying a paint stripper to remove that shine, so that’s an option if you’re needing to remove existing topcoat, though it gets pretty messy and didn’t work 100% like I hoped.
But because I was painting over the rest of this piece, I lightly sanded it over just to create some grit for the base paint. *Unfortunately, and I apologize, I did not take pictures of the dresser prior to or during its makeover.

*You’ll notice I couldn’t remove all of the clear topcoat as shown from the darker brown patchy areas on the top. It required multiple tries of paint stripper, lots of sanding and elbow grease to get this result. There might be another way I could have done this but it is what it is.
Painting the base coat
You might be wondering why I chose a color called celery when I was going for key lime. Mind you, the spray color is just a primer (you could just use white if you wanted), and the base coat painted over that is actually called Iced Mint.
But if you didn’t know, key limes aren’t the same as your typical limes in the store, and they actually have more of a yellow/green color to them when at peak ripeness. Plus, if you’ve ever had key lime pie, it’s not exactly green – it’s actually more of a pale yellow with a slight tinge of green but at first glance it could pass as an off white.
That’s why the color choice I made made the most sense to me! When I look at it and think of green, I see yellow, and when I think of yellow, I see green. I love that this color gives that illusion of both.
Obviously, you are welcome to choose any different base coat color option.

I used the spray paint as an all over coat first, with this idea that it would help eliminate transparency of the wood showing through. I left the drawers intact, and had decided I would keep the insides and sides of the drawers their natural wood color.
After going through two cans for this piece, I carefully pulled open the drawers slightly to prevent any sticking, allowing it to dry overnight. Then I went over the piece with the canned paint using a roller on the sides and any flat areas as well as a brush for the crevices.
Dry brushing and hand painting the details
The details I’m talking about are the teal and bronze accent colors you see on the edges and crevices. I wanted the piece to pop, highlighting its decorative shape without going too loud and crazy.
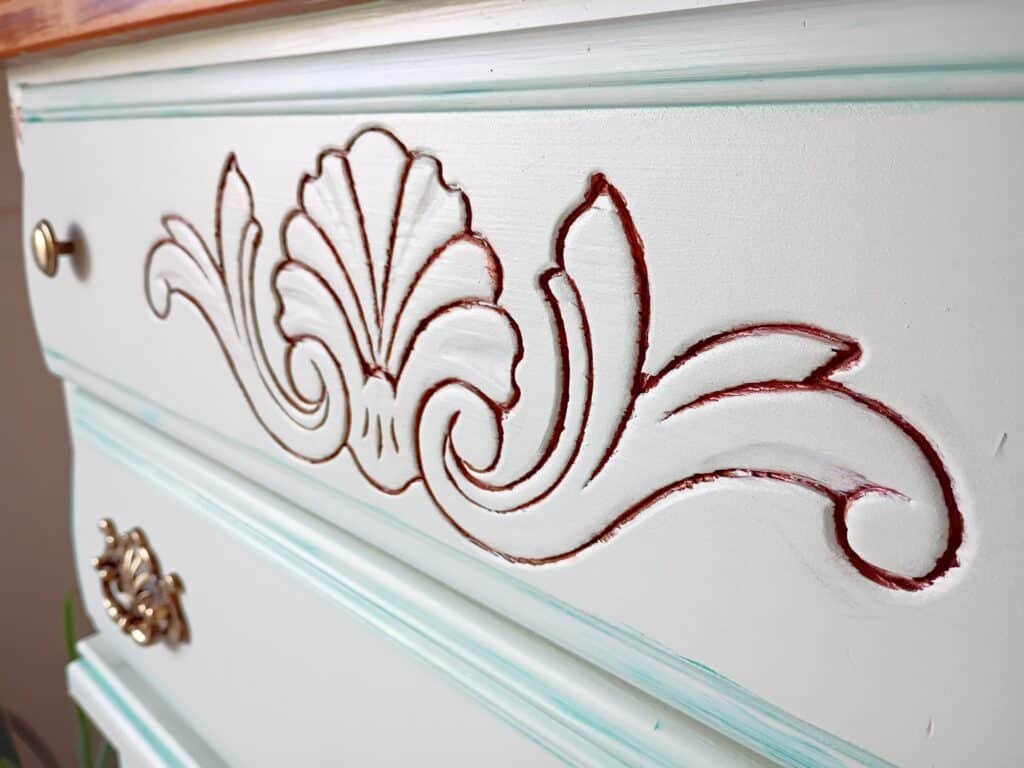
For this engraved design on the front top drawer, I simply took a small detailing brush and used DecoArt Copper, filling in the crevice then taking a damp cloth and gently wiping it to *blend* it. Overall, I wanted the copper to distress the design imperfectly.
Then, using the ArtDeco Metallic Peacock Pearl, I went in with clean brush and lightly painted across the edges of the dresser drawers. Again, with a clean, damp towel, I wiped over where I painted to create that accented distressed look.
If you need video reference on how to create this look (because it can be tough to explain), you can watch the short clip here on a different piece I did.
[Related Read: How to distress wood furniture with a copper patina look]
Poly satin finish and adding the hardware
Once all the painting was finished and fully dry, I gave the entire piece a generous coat of satin polyurethane finish to protect it from use and wear. Be sure to apply in thin coats and allow to dry completely if you’re doing more than one coat.
For this piece, I actually kept the original hardware. I thought they looked cute as is and, I thought they fit the piece so well in the end. But if you’re looking for other hardware ideas for a beachy makeover vibe, here are some other suggestions:
- Half moon cabinet pulls
- Champagne crystal round pulls
- Boho rattan round pulls
- Seaglass light green bubble knobs
- Copper cup pulls
Well, what do you think!? Does it not look like a slice of key lime pie?!

This post contains affiliate links. All products and links listed on TML are affiliates through 3rd parties such as Awin, Etsy and Amazon. Meaning, at no cost to you, by clicking and purchasing through those links I will earn a small commission. As an Amazon Associate, I earn from qualifying purchases. To learn more read TML Terms and Disclosure.